
It seems like everybody in my retro gaming circle lately has been talking about Retro Achievements. I’m not just saying that, either. I tuned into one person’s Twitch, and they were going for the Dragster 5.57. I dropped in on someone else, and they were discussing plans to fill out their Final Fantasy achievements. Donkey Kong, Zelda, Mega Man, you name it, people are going for it. And why not? Applying the modern gaming achievement system to classic games is an awesome idea, and I’m glad they’re doing it. Challenge-based gaming has always been a favorite of mine.
I haven’t gotten on the RA bandwagon quite yet, but with the impending closure of the 3DS eShop, I did finally pick up a 2DSXL system, which I immediately loaded up with Virtual Console goodies. This has spurred me to not only play all these old classics again for the umpteenth time, but to try to maximize them. I want to log the most optimized save state (excuse me, “Restore Point”) I can, before returning triumphantly to my home menu and dragging the vanquished game icon off to the side with its conquered brethren. And when it came time to max out Super Mario Bros. 2 – you know, the silly American one with the radishes – I noticed something… interesting.
THE PERFECT CHALLENGE
To answer today’s titular question, no, there is no “perfect game” of SMB2, for a few reasons. First, as I’ve discussed elsewhere, I’ve come to push back against the term “perfect game” in video gaming, solely because some have chosen to mischaracterize “perfect game” to infer a higher standard of “play without a mistake”, rather than the more applicable “play to a maximized outcome”. (Obviously this mischaracterization comes after the achievement itself, which was adjudicated at the lower standard.) Also, unlike Super Mario Bros. 1 and 3, SMB2 doesn’t even have a numerical score one could track, making the alternative “perfect score” label nonsensical.
There is, however, one objective metric an SMB2 player could track:

You can max out your lives! While there are a few 1UP mushrooms scattered around the game, most of your extra lives in SMB2 come from the between-level slot machine.

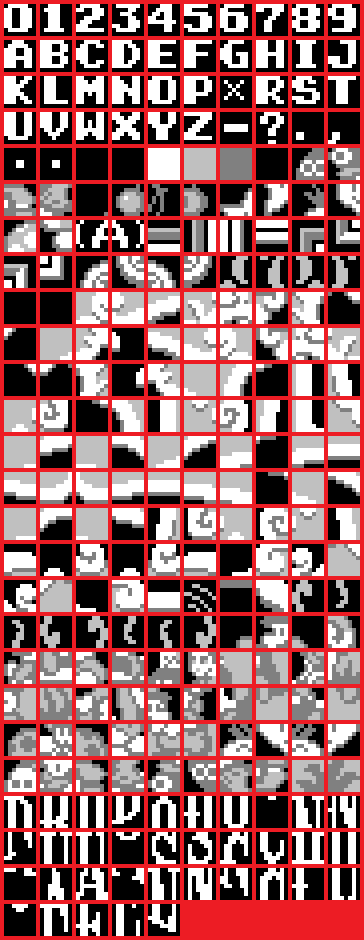
As a quick refresher, rolling a result with a leading cherry gets you one extra life, as does a three-of-a-kind of any non-cherry icon. Two leading cherries up the reward, netting you two extra lives. But the real prize is three cherries, which gets you a whole five extra lives on a single spin. As for your tracker, the game never shows a hundreds digit, but letters in place of the tens digit help you know where your higher life totals are at, from “A” (meaning between 100 and 109 inclusive) and “H” (meaning 170-179) all the way to “P” (meaning 250+). That “O0” you see in the example above doesn’t mean you have double-zero lives, nor is it a tribute to the 00-wearing Jim Otto. (Get it? Aught-O?) No, that’s actually the letter “O” and a zero representing the number 240, just a stone’s throw from the maximum 254, or “P4”, if you will.

Speedrunners have been maxing out SMB2’s life counter for a few years, using practiced precision timing to nail as many triple cherries as possible.
https://www.speedrun.com/smb2ce?h=P4_Lives-NTSC&x=02qo0p9k-rn14mzdn.jq6grjv1
Getting five lives off each spin adds up quickly! Heck, the current NTSC and PAL world records by SheepDog_81 get maximum lives before even beginning stage 1-3!!
But what if you’re not a superhuman speedrunner? What if you’re unable to consistently nail frame-perfect cherries? What if you’re just some uncoordinated klutz who’s confined to the mortal means of mindlessly mashing “A” and hoping for the best?
It turns out, there’s hope for us yet!
THE DEVIL’S PLAYGROUND

Before we continue, I should go over how coins work in SMB2, and how they can be exploited, just in case you don’t know this already. Most of the grass plots you pluck up from the ground are plants for you to throw at people you don’t like. But every so often you’ll find a laboratory beaker with a bubbling potion which, when thrown on the ground, somehow becomes a doorway. This pernicious portal takes you to a dreadful realm of lifeless oblivion and mind-seizing horror known as “Subspace” – sort of an 8-bit version of Stranger Things’ “Upside Down”, if you will. Thankfully, each trip to the nether-realm lasts only a short duration, so this terrifying limbo never has enough time to fully break you of your sanity. Since nothing lives in Subspace and your movement is restricted, you’re left with nothing to do but either pull up more plants, or go jump off a cliff. You could say it’s a very harrowing experience! (Oh, and there are mushrooms that increase your hit points, but you already knew that.) During your first two trips to Subspace on a given level, those silhouetted plants are actually valuable coins – yes, the very coins you use in the post-level slot machine – but subsequent trips during the same level will instead yield more dumb plants.
But here’s where the exploit comes in! As was published in Nintendo Power back in the day, if you die during a trip to Subspace (by jumping off the aforementioned cliff into a pit), the coins you collected up to that point still accumulate, but that trip doesn’t count as one of your two coin-yielding visits to Subspace for that level. This means you can keep dipping into that unholy domain over and over, sacrificing yourself again and again, collecting more coins than the game can reasonably track, all the while effectively exchanging your life for money as if you’re materially fulfilling the pact your ancestors made with the foul demon gods who created that wretched dimension.

For what it’s worth, the coin counter is a single digit, which displays letters and punctuation representing numbers 10 through 39, and which displays bits of game graphics beyond that. I’ve put together a reference chart of each of these symbols here, in case you ever find yourself with a need to determine which particular flavor of “too many coins to count” you have at a given moment. Amusingly, the graphics used appear to be the same ones from the slot machine display itself, so while you mash “A” you can play a minigame of trying to find where on the screen that graphic is used. (Perhaps the placement of that mushroom graphic alongside the other slot machine icons is an indication the slot game was originally intended to use five different icons rather than four?) Also, the letter “Q” is replaced by a secondary “X”, because Fuck Q, amirite?

So easy, peasy, right? Just amass a hoard of wealth, which you can trade in for more lives in the Devil’s casino, which you then cash in for yet more wealth, and eventually you hit “P4” and you win the game.
Well, it turned out to not be quite that simple. This is where I discovered the last factor to be taken into consideration. Much like how your lives max out at around 256, your coins do as well. They at least go up to 255, whereas your lives end at 254. However, if you accumulate just one more coin, and bring your tally up to a full 256, you fall victim to the infamous byte rollover, and your total resets back to zero:

(Two technical asides: First, yes, that display on the left shows the icon from my chart for 254, and not 255. This is because the game immediately deducts a coin when the slot machine starts spinning. See, for example, the difference between entering with one coin, where the display shows “0” with the game running, and entering with zero coins, which also shows “0” and no chance to play. Maybe there is an icon for 255, but it does not appear in the normal game. Second, one might wonder why lives max out at 254 while coins go to 255. I haven’t looked at the code, but my guess is that there’s a routine unique to the 1UP script that says “If you’re at 255, no, you’re actually at 254”, which the coin script lacks. Thus, the unattended coin variable is allowed to increase until it rolls over. Is it possible such a routine was added to the 1UP script specifically because people complained about dying in SMB1 after doing the infinite lives trick there? Maybe. Who knows?)
I was very confused at first, wondering why I had amassed about 420 coins in a particular level, but only got about 160 spins with the one-armed bandit. But realizing my hoard of wealth succumbed to a byte rollover only made me more curious. Sure, if you’re a button-masher like me, the early levels are about simply maximizing coins to any degree, using the Nintendo Power exploit at every opportunity. But eventually, it becomes a resource game, where you’re trying to track how many lives to cash in at optimal spots. And even if I did maximize everything, there was no guarantee I would actually reach “P4” before I simply ran out of opportunities.
I did a few blind button-mashing tests, and using a steady rhythm without any other timing considerations, I found I was hitting an average of about one life for every three coins. But there was a good deal of variance with that. Sometimes I’d hit more, sometimes I’d hit less, and when the number was way off, it tended to be much lower rather than much higher. (Those triple-cherries don’t like showing their heads for us speedrun weaklings!) This meant the exploit was really only useful if I could get a minimum of four coins for each life traded in. Spots where I could get five are better, but a few treasured locations gave you an exchange rate of six or more coins per sacrifice.
And so, I went to work on my level-by-level coin and life counts, to see how my button-mashing quest for “P4” might play out.
FISCAL PLANNING

There’s no opportunity to use the exploit in 1-1. But there is a standard 1UP mushroom. When you go into Subspace to get a power-up mushroom, don’t forget to pluck up all the surrounding plants first. That way, that trip doesn’t count as one of your two coin-collecting sessions for that level, and your path is now clear for easier coin accumulation on your next visit. Here, the end of screen-scrolling works in your favor, allowing you to place the doorway to the far side for two easy trips worth of 7 coins each. Starting with 2 lives in reserve, 14 coins will net you about 5 lives, plus the 1UP mushroom, bringing your total to 8. (Again, all estimates are derived from a button-mashing average of one life per three coins.)

1-2 is your first chance to use the exploit. In fact, you have two options! Neither of them are great, but hey, that’s what reset buttons are for. Inside the cave, you can bring a potion down from above and use it on the middle platform for access to six coins and an easy death. You’ll want to practice this sequence before starting your real run, since the hurried platforming can be tricky. You can also try outside, with a potion door directly above the real door on the hill. (Note that if you place a Subspace door on the exact same spot as a regular door, the regular door takes precedence.) However, in my practice, it’s difficult to consistently pluck six plants and run to the ledge and fall the necessary distance to your death before your visit to the Shadow Realm times out. (There is a seventh plant along the edge of the screen, which the game sometimes lets you collect and sometimes not. Why you can only sometimes collect that plant remains a mystery, at least to me. But you definitely won’t make that jump in time after collecting seven coins.) At any rate, another 1UP mushroom means you’ll be sacrificing 9 lives for 6 coins apiece. Add to those 18 coins from two normal visits to Subspace, and you get a grand total of 72 rolls at the craps table, which in our simulation equals 24 extra lives.

There’s no 1UP mushroom in 1-3, but we do get another great chance to use the exploit on this five-plant hill. I recommend dipping into the far door past the potion to make your repeated journey to that hill easier. You can cash in all 24 of your spare lives for 120 coins, plus two more visits that “count” for a total of 130. Just remember, if you do sacrifice all your spare lives, you’ll be playing a dangerous level concluding with a mildly annoying Mouser fight, all on your last life. Die anywhere in that stretch, and you’ll have to start over. If you succeed, those 130 spins at Satan’s roulette wheel, estimated at a 1/3 average yield, will bring your life total up to a solid 43. Pretty good for only three levels of button-mashing work!

There’s only one spot for coins in 2-1. To refresh the potion, you will have to travel all the way to the later door and back, but they don’t call it dedication for nothing. Two visits will net you 6 coins, bringing your life total to 45.

The bounty is back in 2-2! (See what I did there?) Another 1UP mushroom, and another fine chance to squeak out extra coins at four-per-life. Again, it’s much easier if you dip in to clear out the power-up mushroom first. Otherwise, go to town to the tune of 46 lives, at four coins each, netting 184 total coins, plus another 8 coins from two non-dying trips, which all told should yield an average of 64 lives.

No exploit in 2-3, but there is a room with 8 potential coins. You’ll want to bring Toad, your speediest plant-plucker, to collect them all. Again, clear out the plants first to collect the power-up mushroom before returning to go coin-collecting. The vegetation-resetting door makes this pretty easy. 16 coins at button-mashing speed will get you about 5 lives, bringing your total lives to 69. (“69, dudes!”)

In 3-1, you’ll be jumping off the waterfall, except in the regular SMB2 world this time. Don’t worry, instead of dying, you’ll be taken to a hidden area with more coins than you can collect. Once again, bring Toad for maximum pluckage. I believe I was once able to get 10 coins, but typically the most you will collect consistently in one trip is 9. (I found that the coins you appear to collect at the end of your Subspace visit, as the scene transitions back to the regular game world, don’t always count toward your final total.) At any rate, 18 coins mean 6 more lives, bringing our tally to 75.

There are almost no coins to get in 3-2. Princess Toadstool may be a slow gardener, but she can collect the maximum here, and she skips most of this level with ease. Once you climb down the subterranean ladders, you can’t get back up to the first patch of 4 coins, so you’ll have to settle for the 3 at the end. 7 coins yield 2 lives, bringing you to 77.
You may notice we’re nearing the halfway point of the entire game, and we’re still not even a third of the way to the maximum 254. But maybe when we start cashing in the exploit again, with more to lives to sacrifice, our totals will climb faster?

3-3 is another dud level. 3 coins here, 3 coins there. Bring the Looge so you can carry a Ninji up and skip a bunch of the level. And say “Hi” to Red Snifit while you’re there. 2 more lives gets you to 79.

We’re back to Exploit City, baby! 4-1 is definitely the trickiest level to use the exploit on. For starters, near your first potion plant, you have five other plants in a row to collect as coins, all on a slippery ice plane. Instead of a broad cliff, there’s a single tile pitfall, giving you a narrow target to hit. (Remember, if you fail to register death before Subspace ends, that visit counts as one of your two trips. So you can only miss that jump once!) Oh, and the spot with the plants also happens to be hosting a convention of little marshmallow guys who like to dart at you from all directions. And a fish, because game design I guess?

Given the dangers of this section, collecting both power-up mushrooms is as important as ever. This is a bit of an odd sequence, but I recommend starting by collecting the power-up mushroom near the first potion plant (away from the other plants so it doesn’t trigger as one of your two coin sessions), then going all the way to the platform at the far end. Bring that potion all the way back to that row of five, collect the five coins, and die. Then, on your second life, start by going to the far platform, and collecting that second mushroom nearby, using the door at the location on the stairs shown above. DO NOT clear out all the plants on that last platform, because that final plant is a rocket which will take you inexorably to the next area, from which there is no going back, meaning your run will be over. Once you collect that second power-up ‘shroom, return to the marshmallow mosh pit and resume as normal. Remember also that these two power-up collecting trips must be done on separate lives, since you only have two available potions, one of which must be used to fuel your insatiable coin-collecting hobby.
(Note that it may be tempting to try and go for the far potion, near the rocket, and bring it all the way back to the previous area. This would give you a shot at collecting the row of five plants along with the nearby potion plant for a total of six. But it was my experience that this isn’t consistent enough, given the ice physics and the difficulty of hitting that death jump every single time for almost 50 consecutive trips to Subspace.)

This is also the first level where you’ll be maxing out your coins. In a way, this is a good thing. If you screw up a jump and die, it only costs you 1 life, and not 6 coins which become 2 lives which become 4 lives on the next level which become 8 lives on the next level, etc. But it also means you now have to count your coins more carefully. It also means you’ll be aiming to sacrifice a very specific number of lives, which you’ll have to keep track of for yourself, since you are unlikely to arrive at 4-1 with the exact average life total I’m using in these tallies. By my math, the optimal play is as follows: Cash in exactly 49 lives, for 245 coins, then collect 8 coins the standard non-dying way (at the row of five and on the final platform), to bring your total to 253. Given the 1/3 masher’s average, it’s not worth sacrificing another life to boost that total by two coins. Note that, if there were a normal doorway anywhere in this area, you could dip in and out to refresh all the plants, thus collecting 10 coins from two standard non-dying visits to the row of five, but you have to make do with what you have.
Using our average example, we started 4-1 with 79 extra lives. Having sacrificed 49 of them, you should find yourself starting the slot machine game with 30 spare lives, and 253 coins. Those coins will net you 84 lives, bringing your total up to 114, or “B4”.

Okay, so we’re starting to get there?

Here’s where we really ramp up our little money laundering scheme! 4-2 has a perfect series of platforms with a potion and six other plants. Once you’ve sacrificed 40 lives for 240 coins, you can use your last life, and a refresh from passing through the normal door that got you here, to collect 14 more coins for a total of 254. (You could try to bring the other potion from further out left to collect a total of seven coins for each time you use the exploit, but good luck getting that consistently. Also, the whales’ water spouts along the way have a tendency to kill you if you’re in a rush.) 254 coins will provide about 85 lives. 114 minus 40 plus 85 equals 159, or “F9”. Just don’t celebrate by hitting F9 on your keyboard!

Man, World 4 is where the action’s at! Once again, six coins per sacrifice, as long as you remember to bring the potion along for the Birdo ride. Don’t get cute and think you can skip that ride by dipping into the far door, because then you will have no potion, and you will be sad. While Luigi and Princess can skip most of this level, their plant-plucking power is particularly pathetic, so you should just use Toad again, and beat the level normally. (At least now, since you’re hitting maximum coin count, you’re not sacrificing yourself down to zero lives, so your run isn’t over if you die on the regular level.) Trade in 41 lives, then use your next life to collect 2 coins near Birdo and 6 non-dying coins on the far platform. This brings you to 254 total for the level, again one shy of the maximum, and again yielding about 85 lives. 159 lives, minus 41, and plus 85, equals 203, or “K3”.
Going from 79 to 203, World 4 brought us so much closer to that final target of 254! But at the same time, there are limited opportunities to use the exploit. We only got to use it once in all of Worlds 2 and 3. Are we going to reach “P4” before we run out of time?

I knew 5-1 had an opportunity for the exploit, as that was the level originally featured in Nintendo Power. Princess Toadstool might have an easier time crossing this difficult fish-hopping level, but Toad is the only one who can consistently collect 6 coins per death here at the first waterfall. Real time also goes by much quicker here now that you don’t have to ride that stupid egg across an ocean. Trade in 40 lives for 240 coins, plus 12 more coins from two normal trips through the nearby door and back, and all of that’ll get you a return of about 84 lives. 203 plus a net gain of 44 lives and an extra 1UP mushroom along the way brings you to…

248.
This was where I sat up and said “Holy smokes! You’re telling me I went through all of this just to discover that the button-mashing maximum is a distant target with a narrow window that’s difficult to hit? I could come all this way, do everything right, and fall just a bit short at the end to some bad slot machine luck!?”
Well, not quite. In addition to the few random sets of non-renewable coins and another standard 1UP you get in the subsequent levels…

… it turns out that 6-3 has another spot to use the exploit, although it does involve a tricky series of bomb-away walls:

If you do end up requiring this last trip to the horse races, I recommend climbing up that vine toward the end, allowing you to restart there after each death. Start by bombing away the necessary walls in sequence, then circle back up for the potion plant. With perfect execution each time, you could actually get 8 coins for each sacrifice, but again, you can only fail to hit the timing once before you run out of chances. However, you can still get 7 coins here very reliably, and 7 is still a big haul compared to every other spot to use the exploit. (Just don’t forget to skip that Subspace plant on the far left, or else you’ll run out of time.) Plus, if you screw up the setup before heading into the Subspace door, you can easily poke your head above the vine and try again.
If you’re truly concerned about hitting the maximum before you run out of levels, you can take extra resets early on. Remember that all of these are just averages, meaning you can have an above-average start. And with the strategy of effectively multiplying your extra lives, a few more lives early can equal many more extra lives later on, before you start hitting the coin maximum.
SEALING THE DEAL

So you might be thinking “Well, that’s it, right? I hit ‘P4’, I maxed out my lives. That’s all there is to do here.” Ohohoho, how wrong you are, though! It’s one thing to reach maximum lives – again, precision speedrunners have done that even before reaching level 1-3. But it’s another thing to complete the game with max lives.

7-1 is just the calm before the storm. With an easy 12 coins available, you can even afford to die a couple times along your way up the ladders to gray Birdo.
But I would say, the real challenge of the entire run is 7-2.

You see, while there are a couple coins you can collect here, they mean nothing, since there’s no slot machine after you defeat the big bad Wart. And there are also no standard 1UP mushrooms, which means, if you want to complete the game with maximum lives, you have to pass the whole final level without dying, and you have only one shot to do it. And if you fail, you have to do all of this again from the beginning.
But really, as competitive gamers, we wouldn’t have it any other way, would we? After all, it just wouldn’t be a “perfect game” if you didn’t have some Herculean task before you right at the end, upon which the fate of hours of game play rest. That way, you can regale your friends for years with tales of your late-level heroics, recalling the details of how you struggled against this final obstacle, with everything you’ve accomplished to that point on the line, and overcame your momentary uncertainty to triumph in the most dramatic fashion possible. That is, if you fancy yourself a storyteller, anyway.

Personally, I would recommend going to the far end of the first chamber, going up and getting the power-up mushroom along that path, then circling back down and taking the other path, which has the second power-up mushroom, giving you some added security in the later stretches against Birdo and Wart. (And don’t forget that bird-door thing that flies out at you!) Watch out for the second Shy Guy in the first chamber in particular – or rather, watch out for the overhang right above him. Take it slow, and once you get the key, don’t be afraid to use it to beat up on some reappearing Sparks over and over to get refill hearts to restore your life total.

Again, I wouldn’t call it a “perfect game” exactly, as you can make many, many mistakes as you max out the one objective metric the game provides. And even using blind button-mashing, it turned out it still wasn’t quite as narrowly difficult as I had begun to suspect. But still, it seems like a neat thing to do, one I look forward to trying – I mean, without the save states I used to capture all these screenshots. Any one of you can hit SMB2’s “P4” pinnacle, and you don’t have to sit there and pain your eyes trying to hit frame-perfect cherries to do so – although you certainly can if you want to!
Which brings us to our second topic of the day:
THE NEW TWIN GALAXIES BOUNTY SYSTEM
Recently, Twin Galaxies (the current non-corrupt iteration owned by actual gaming enthusiast Jace Hall) rolled out a new “Bounty” system:
https://www.twingalaxies.com/bounty
Basically, instead of casual-competitive gaming being limited to world record chasing, now you can define and attempt distinct gaming challenges. The existing TGSAP adjudication system is used to authenticate all bounty submissions. (Note that a site without this pre-existing infrastructure would have a hard time creating it from scratch to start a similar system of their own.) The three types of user-created bounties allow you to wager either TG submission points, a “custom reward” of your choosing, or no wager for a just-for-fun challenge. TG administration also offers a fourth bounty type, awarding something called “TG Achievement” points. (It’s “Achievements” everywhere you look!)
As someone who has been occasionally critical of TG in the past, I must say, this looks very sweet. I’ve always found myself drawn to challenge-based gaming, but I always preferred the challenges that involved slower, more methodical play, rather than simply “Beat the game as fast as possible”. Much the way speedrunning has pushed the limits of older games to extents never thought possible, I’m excited to see if challenge-based gaming can push these classics even farther.
Already, the TG bounty system has had a few interesting entries. BenSweeneyOnBass opened a for-fun bounty for the “NES Black Box Triathlon”. Barthax offered 10 TG submission points (already claimed) to anyone who could beat his old Street Fighter Alpha 2 record. And Swaggers facetiously opened a 1,000 submission point bounty for anyone who could achieve a 5.54 on Dragster. And those are just the user-created challenges! Even with the bounty system still effectively in beta testing, TG administration has laid some serious cash on the table. $250 gift cards were offered on games like Crazy Taxi and Montezuma’s Revenge. $1,000 is still available on Pole Position and arcade Star Wars. The still-elusive million point Ms. Pac-Man game would net someone a $1,000 Amazon gift card. $250 has already been given out to the top 10-minute score on Donkey Kong, and a $5,000 gift card awaits anyone who can score a verified 1.3 million (which would be a new world record).
This is both the kind of positive gaming challenge system I would like to promote, and a fun user-driven tool through which I can get in on the action myself. I can’t offer any money like TG administration has done. (You may have noticed this website doesn’t run ads, meaning I’m currently paying for hosting and such out of pocket.) But what I can offer is recognition, here on this site that occasionally gets traffic through honest and detailed coverage of whatever gaming-related controversy happens to be making news at the given moment. To that end, I’ve established four gaming challenge bounties, for some community fun.

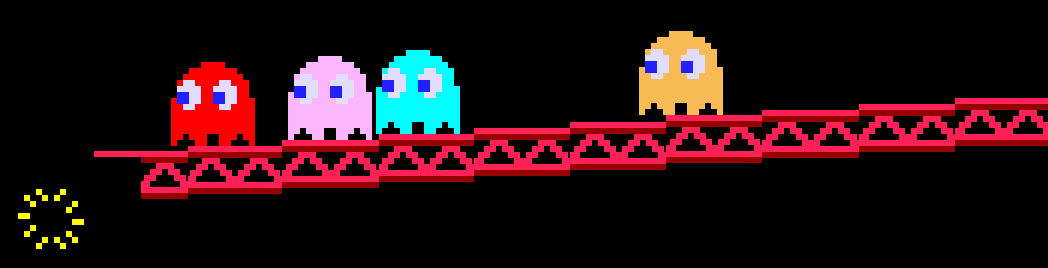
First up is a straightforward one. This site’s called perfectpacman.com, and I literally just wrote about getting perfect on Pac-Man through the first eight boards, so here’s your chance to try it too. Final Fantasy 6 happens to be my favorite video game of all time, and I’ve always been fond of the fewest-steps challenge, so the second bounty is for the fewest steps to defeat Kefka at Narshe (with some restrictions). Next, a challenge to see how far you can get in Legend of Zelda: Ocarina of Time without taking damage, as measured by number of Gold Skulltula tokens acquired. And lastly, as described above, beat Super Mario Bros. 2 with 254 extra lives.
https://www.twingalaxies.com/bounty/pac-man-perfect-through-8-ppmdc/
https://www.twingalaxies.com/bounty/final-fantasy-6-fewest-steps-to-beat-kefka-at-narshe-ppmdc/
https://www.twingalaxies.com/bounty/super-mario-bros-2-beat-the-game-with-254-extra-lives-ppmdc
Click through the links to see the full rules for each. In doing so you may notice that, for added fun, the FF6 bounty allows emulator timing tools like save states, fast forwards, and frame advance, and the Ocarina of Time bounty allows major glitches!

The idea behind these PPMDC bounties is, rather than being a single prize with a single winner, anyone can lodge a successful completion of the stated challenge in the given timeframe, although for a little competition there will also be a “top billing” to anyone who beats the challenge most effectively by a given metric (usually time-based). These bounties run through the end of March, with a write-up on the results to come in April. Hopefully one of you jokers reading this submits a run, so I don’t end up just writing about myself. Also, if you’d like to participate but don’t have or want a TG account, rules for how to submit your run directly to this site can be found on PPMDC’s new bounty page, linked in the top bar:
https://perfectpacman.com/bounties/
Happy gaming!
How weird that you mention RA and the 3DS eShop in the first paragraph. I’ve been getting all of my friends into RA over the past month or two, and I was just buying gift cards for the eShop last night to go buy a bunch of 3DS stuff before the store closed. Are you me, ersatz cats?
lol Great minds think alike. 🙂