
My how time flies! Back in December, I used this site to promote four new retro gaming challenges using TG’s newly unveiled bounty system. Since this site generates no income (meaning, I run it at a loss as a public service), the only meaningful prize I was prepared to offer was achievement recognition here on the site. I mean, it’s no Retro Achievements, but it’s something, right?
For my target month, I chose the far flung future of April 2023. This gave people time to play the challenges at their leisure, and hey, let’s be honest, it also gave me time to not worry about it as I continued this site’s typical gaming news coverage and commentary. However, like all distant futures, this day was destined to arrive eventually. Not that I’m not excited! Because it means I get to feature the people who did submit to my first challenges, and… I get to introduce four new ones!
PAC-MAN: PERFECT THROUGH 8
I’d like to start by thanking everyone who submitted to the Pac-Man bounty. It was a no-brainer which game would be the first to feature in a PPMDC bounty challenge. Conveniently, in November, I had also written about my own quest for a perfect score on original Pac-Man, and how I was able to conquer the first eight boards. And since I’d like for others to take up the overall Pac-Man perfect score challenge, a “Perfect through 8” bounty seemed like a great stepping stone toward that.

Our top billing for that challenge goes to TG user Almighty Dreadlock, whose time of 9:55 narrowly beat out an initial submission from David Race of 9:56. Both of these can be seen on TG, and David uploaded his to YouTube as well. Since both used nearly identical strategies, I’ll discuss both together, using stills from Dreadlock’s run.

Both obviously went for a fast pattern on the Cherry board, using a start similar to the “Cherry Bomb” pattern, deviating from that after the first energizer. (Apologies to these patterns’ original creators, as I should be crediting them, but I don’t know for sure who they are.) Notably, as seen above, both the SW and NW energizers were collected immediately after the last ghost from the previous energizer rematerialized in the pen, minimizing the time spent dawdling around. Both cleaned up a little differently at the end, with AD holding a narrow lead at that point.

Their Strawberry and Peach 1 patterns looked pretty familiar. They both started out as the same patterns I used in my perfect score practice, with the Peach pattern being one of Pac-Man guru Neil Chapman’s, and the Strawberry one being a random pattern I found online. In this case, both Dreadlock and Race took reversals, after the NE energizer on the Strawberry board, and before the second fruit on the Peach board. Dreadlock’s lead widened to about a whole second after three boards, with ghost positions confirming this wasn’t just a case of uneven recording speeds.

AD and Race continued with identical patterns on the two-second boards, resulting in some nice grouping at the SE energizer.

While the identical patterns mostly continued, David and Dreadlock did employ differing approaches to the end of the two-second boards, as they awaited the final energizer. David (seen on the left) skipped one dot and parked face-down, while Dreadlock (seen on the right) ate all the way to the top before returning to face right. In the end, this didn’t seem to affect the outcomes on their times, with Dreadlock’s initial lead carrying him all the way to the end.
Almighty Dreadlock used this opportunity to provide the following remark, which I’m sure is directed at nobody in particular, lol.
Real men play real games for real. They don’t pretend, and they don’t give themselves laughable titles like ‘Video Game Player of the Century’.
I wholeheartedly agree, sir!
The other official submission was from TG user wwdkong. It turns out, wwdkong has also worked on maximizing his points on Pac-Man. I’ll get to his bounty submission in a moment, but he used his opportunity to discuss his own approach to developing and retaining Pac-Man patterns, including for the one-second boards that proved to be my roadblock:
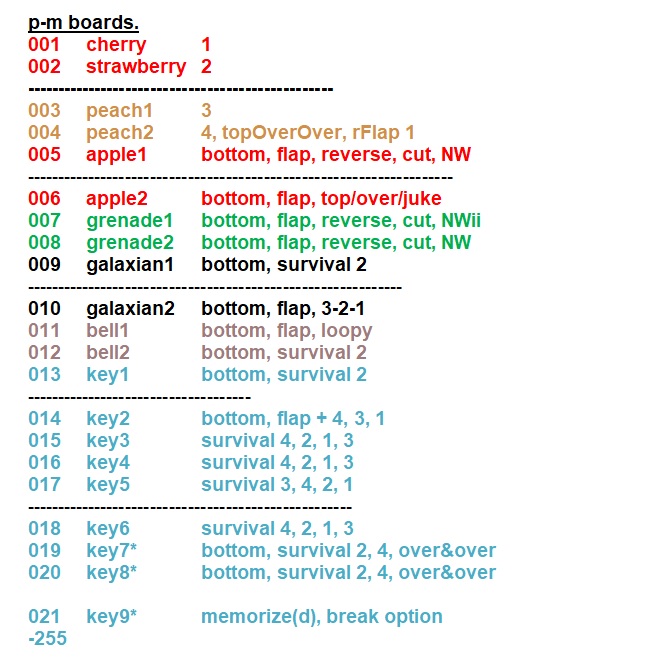
So, this regards my high score attempts on Pac-Man, and there may be a tip or more that someone would like to use. Walter (ersatz_cats) mentioned the 1-second boards in Pac-Man, where the monsters are only vulnerable for 1 second upon eating an energizer. I started talking about it there.
Just because I like things to feel kind of symmetrical or something, I actually created my patterns for the 1-second boards to get zero monsters, which wasn’t very difficult. It had already been a pain to find perfect patterns (eating all 16 monsters & both “fruits” per board) for the 2-second boards, so it was a nice break to get zero monsters on the 1-second boards. My goal wasn’t a perfect game, but rather a high-as-I-can-get score. It turns out that my limiting factor on my 1.8M p.b. mame game was the fingers getting sore and tired, pressing so hard on the keyboard trying to do the patterns and get the timing right.
I also thought I should make the patterns as easy to remember as possible, so I tried to start a number of different boards the same way, where I could get away with it. So then I also created keywords for each board, and put them into a text file (I prefer wordpad, though it keeps deleting one of my spaces between sentences, grrr), one line per one board as much as possible, trying to condense it into short phrases, I bolded and colored each line to approximate the “fruit” for that level, and when I played I’d look at it between boards & then concentrate on the keywords for the current board, to help me remember the pattern.
I also thought it was important that my 9th key pattern be not-too-difficult to execute. As it was, I had some trouble in some spots of that pattern, so I knew when I had to concentrate a bit more. I came up with one 9th key pattern earlier, but it eventually occurred to me that it was probably too difficult to execute it reliably, so I came up with another one.
So when I was actively trying to get a high score, I generally had some threshold in mind for how many lost lives I was willing to tolerate before the 9th key, as well as at earlier and later points in the game. If I wasn’t okay with how many I’d lost, it was a reset. One thing I remember finding quite interesting, was how the screens on which I was able to use identical patterns appeared to be different than the identical sets of screens that Neil Chapman posted online, apparently co-created by Rick Fothergill and Adam Sweeney.
wwdkong also generously provided his referenced reminder notes, both as an rtf text file, and as a jpg, if anyone finds these helpful in their own quest for Pac-Man mastery:
https://perfectpacman.com/wp-content/uploads/2023/04/Bounties02-pac-manBoardsForWalter.rtf
https://perfectpacman.com/wp-content/uploads/2023/04/Bounties02-pac-manBoardsExample.jpg
True to his word, wwdkong’s submission featured the same opening on seven of the eight boards (all of them except the slow Cherry board):

I loved two things about this. 1) This opening is viable on each of boards two through eight, despite many of the boards running at different speeds, and 2) while the coast along this path was clear on boards 5-8, on boards 2-4, this opening resulted in a Pinky pass-through on each board:

wwdkong’s submission was slower and more risk-averse than the competition between Almighty Dreadlock and David Race, but in the end, the score is the same. Per the bounty rules, I had to get this page up by the end of April, and so I didn’t have time to draw out each of Wade’s patterns, but the common start is an interesting approach. If you are interested in maximizing your score on Pac-Man, I would recommend giving his perfect-through-eight a watch, and seeing if maybe those patterns are more to your liking than the ones I provided in November.
Speaking of the bounty rules, when I set up the PPMDC bounty page, I added an option for direct submission to this site, in case anyone wanted to participate but didn’t have or want a TG account. David would later use this option to submit two faster runs, first with a time of just under 9:54, and then one clocked at 9 minutes and 50.73 seconds. (I believe David ran out of TG submission points, which one earns by adjudicating other people’s scores, which he did not want to do.) Astute readers may be asking “Wait, if this was faster, why didn’t this get top billing?” In short, by using TG’s bounty system, I have to adhere to TG’s bounty rules, which require that the promised prizing (in this case, “top billing” recognition) go to official submissions, put through the community TGSAP process, and not entries I choose to adjudicate myself on the side. I am certainly allowed to recognize dope game play anyone sends me, but it has to be done in addition to fulfilling the prize I promised. Also, it’s fair to point out that since this was submitted through a different channel, Almighty Dreadlock would not have been properly notified that his time was beaten, which would have given him the opportunity to improve his own submission. In short, nobody did anything wrong, and no one disputes that David Race is the overall reigning Pac-Man champion, with the fastest perfect score on record and the ability to notch a perfecto on command. But rules are rules, and so Dreadlock is the official winner of this competition.
That said, what David lacked in TG submission points, he more than made up for in swag points. For starters, in his initial official submission, David tacked on a perfect ninth board (first Galaxian), just for good measure. But his later submissions added something this relative Pac-Man novice had never seen:

With expert timing, David ended the second Peach and first Grape boards collecting the last ghost on the last dot. As you can see above, that final ghost still appears on the screen as the play stops, even though the points have already been collected.
You may ask how David was able to shorten his time, given he was already using very fast patterns for the first submission. The swag ending to Grape 1 turned out to be a bit faster, and a similar ending on Grape 2 cut his time a little more. But the most noteworthy time save came on the Strawberry board:

As you can see, after clearing the third round of ghosts, David took the inside lane up, instead of the outside lane seen in the other submissions. This not only collected six dots that didn’t have to be accounted for later, but it also slightly adjusted the ghosts’ positions. That tiny turn to the right you see by Pinky was all it took to send her completely off course. When blue time was activated, instead of turning up with the others, she turned down and veered away:

When watching casually, it looks like an accident which David had to break pattern to recover from. And yet… this “accident” resulted in David finishing the board much faster:

And then, for one final bit of swag, on the sub-9:51 run, David executed a false right turn for an end-of-playback park.

[NOTE: As this piece was being finalized, David sent me an inp file for a TAS for boards 1-8, recorded on MAME 085. I did not have time to evaluate it prior to publication.]
David used his opportunity to thank everyone who participated, along with yours truly. (Aw, shucks).
Big congratulations and kudos to Almighty Dreadlock and Wwdkong. Very nicely done!
I would also like to thank Ersatz_Cats for the opportunity to participate in this challenge. I really appreciate it.
And thank you again to everyone who submitted to the Pac-Man bounty!
SUPER MARIO BROS. 2: BEAT THE GAME WITH 254 EXTRA LIVES
Pac-Man was the only of my bounties to get any non-ersatz submissions. At present, the TG community tends toward arcade gamers, and “Perfect through 8” was more straightforward than the three console game challenges I posted. But I’d like to cover my own submissions toward those anyway.
When I introduced the PPMDC bounties, it was with a write-up on some number-crunching I had done on Super Mario Bros. 2. Speedrunners max out their lives on SMB2 using frame-perfect triple cherries, which even after I learned was possible, still eluded this mortal button-masher. But it turned out, if you use a known coin exploit at every available opportunity along the way, assuming your button-mashing luck isn’t terrible, you can eventually reach the maximum 254 lives over the course of the entire game, frame-perfect precision not required.
I’ve already said most everything there is to be said about this challenge back in December. I ended up not submitting an official run for this, since (as I alluded to in the original write-up) my real desire was to have it on my 2DSXL, and I had no interest in duplicating the feat on a platform I could fully record. But I will say… my victory was much more narrow than I was expecting. I’m not sure when it happened, but at some point I fell way behind pace for maximum. Even after collecting seven coins per life on 6-3, I was still struggling to get there.

After blanking on those last five coins, I sat at “P3” (one short of the maximum “P4”) going into 7-1, needing the very last batch to hit maximum. You can overhear some Star Trek on TV as I finally hit “P4” going into 7-2:
Having only one chance to clear Wart’s Castle without dying, I very carefully snuck my way up to the first mushroom, then backtracked down toward the second. Even after many close calls along the way, I still had to face Birdo on my last hit point to collect the key, which I used to beat up Sparks over and over to refill my health. But as you can see, with my beginning-of-game restore point still preserved, I got there:
THE LEGEND OF ZELDA, OCARINA OF TIME: GET AS FAR AS YOU CAN WITHOUT TAKING DAMAGE
I didn’t really know what to make of this one going in. All I knew was that it was technically possible to beat the entire game without taking damage, as demonstrated by CarcinogenSDA:
I ended up streaming my attempts on Twitch. While the terms of the bounty allowed major glitches, I’m a bit traditional, and so I played it the old-fashioned way. After some de-rusting, and figuring out how to beat common enemies from a distance without the slingshot, I was able to get the three Skulltula tokens inside the Great Deku Tree consistently. A few pitfalls included… well, this pitfall:

Hitting the floor near the web because you fell too short or too far is a game over for this challenge. And when you do fall through the web, you need to either land in water, or grab the climbing wall, but don’t grab it too close to where the Skulltula is parked.

There’s a room where little baby Gohmas drop on you from above. You can avoid them walking around the room’s perimeter.

The room with the three Scrubs is a bit tricky, as you have to neutralize the middle one first, while the other two are in range of firing at you. I got my best results holding back until the other two fire, then approaching the middle guy when the coast is clear, while having that shield button ready.

But the real challenge was Gohma. Silly me, I thought I’d just jump in and slash at him like I see those speedrunners do. And every time I tried that I got hit, which for my self-imposed challenge was game over. After a few restarts of that, I decided to play him more carefully, as I should have done in the first place.

Attacking normally doesn’t put you in immediate danger. The only things it introduces are A) time (hence why speedrunners don’t do that), and B) when Gohma returns to the ceiling, he drops down three baby Gohmas you have to deal with. But they’re actually easy to destroy with Deku Nuts, provided you do it promptly. Get rid of the three, get out of the way, and wait for Gohma to descend so you can stun and smack him again. Wash, rinse, repeat. GG.

Once you defeat Gohma, the world is your oyster. I managed to collect thirteen Skulltula tokens around Hyrule, Kakariko, and Lon Lon Ranch, before getting pinned by some nighttime baddies in the corridor outside the Ranch.

As far as avoiding all damage goes, that narrow passageway is very precarious at night. If I had it to do over again, I’d wait to collect nighttime items at Lon Lon until after I have the Sun Song, so I can avoid that corridor at night altogether.
Anyway, it was a fun challenge. If you enjoy Ocarina of Time, I recommend giving damageless a shot. As I played, the thought occurred to me that I could maybe look into playing each game’s segment damageless, saving only at certain predetermined intervals (such as before and after each dungeon). Doing so, one could amass what would basically be a segmented run of the whole game damageless. With enough practice, and with consistent enough strategies, one could maybe even turn that segmented experience into a full game RTA. (Ah, if only there was enough time for all the gaming goals I’d like to shoot for!)
FINAL FANTASY 6: FEWEST STEPS TO BEAT KEFKA AT NARSHE
While I went into the Zelda challenge mostly blind, I knew exactly what went into minimizing steps to Kefka at Narshe on FF6, having done it casually on console years ago. I had also posted a Twitter thread noting pitfalls to watch out for, hopefully without spoiling the fun of strategy exploration. But with the challenge now past, and a full stream run in the books, “fewest steps” strategy is exactly what we’re here to discuss.

The first order of business is easy: Kill Vicks and Wedge, so Terra gets all the experience from these required fights in Narshe. The more levels she can go up now, the more levels everyone else begins with. This is made a bit complicated by the fact that you can’t use the “Fight” command here, and the Magitek abilities can’t target yourself. But you can wait for the enemies to kill the two bozos while you heal Terra, or use her Fire magic to expedite the process. It also doesn’t hurt to put Terra in the back row.

Of course, on a fewest steps path, you have to skip many things, including that first save point. Leading up to Whelk, I accidentally got myself pinned next to the gate. This is one of many hard-to-identify spots that will force a reset on your fewest steps run. Thankfully, this challenge explicitly allowed emulator timing tools like save states and fast forward, so solo Terra against Whelk wasn’t too tedious.

Having given my characters classic Final Fantasy names, it was time for the Moogle fight. No option for Mog or Dusk Requiem here. It’s Locke’s party all the way! With the right path, a little bit of luck, and maybe multiple attempts, you can emerge onto the overworld for your first proper save.

The only thing weird about Figaro is having to exit and reenter to conserve steps as you talk to the necessary story progression figures. Once you have Edgar’s AutoCrossbow, random encounters get a lot easier.

You don’t even get to see South Figaro as you make a beeline for Mt. Kolts. Here’s where it’s good to remember to steal any time you have a good opportunity, such as a pre-emptive attack. It’s not just common use items you’ll be wanting, but actual equipment as well. Also, I managed to get myself stuck in another trap spot right near the end of the spiral leading up to Vargas. Don’t do that.

At the Returners hideout, you find the first of two very tedious sequences in the early fewest steps route. As you recall, you have to speak to each of Locke, Sabin, and Edgar, before the guard at the door will let you out to speak to Banon. Most notably, in the room with Edgar, you have to wait until he randomly wanders all the way over to the spot next to Terra before you can turn to the right and speak to him. Edgar’s pattern is always different, even when restarting from a save state just a few steps outside the room. But (aside from some initial randomness) the pattern seems to repeat endlessly, meaning Edgar will either reach that spot over and over, or he won’t reach that spot at all. After several resets, I finally got a pattern that worked, only to speak to the door guard and get the wrong message. It turned out, I had saved state before talking to Sabin, and didn’t talk to him again after loading state. D-oh!!

After humbly going through the Edgar drill again, and getting a meager Gauntlet for my trouble, it was off to the river escape. When you jump onto the raft, your current party will be fully healed, but you’re still at low levels, so you’ll need constant healing along the way. Before proceeding, either set memory cursor, or use the menu to move Banon’s “Health” command to the top, so you never miss a free heal. Also, along this river you will be forced onto your first save point of the game, giving you the introductory message you normally get way back in Narshe.
Note that, to preserve the challenge, this particular bounty expressly forbid any infinite experience loops, which required turning left on the second river junction. If you’re going for a true full game fewest steps challenge, you will want to take many “up” loops at that junction, since Terra will have to learn the Warp spell by at least the time you approach the esper gate. (And with the ability to automate Banon’s Health command, there isn’t really a reason not to leave the game on turbo for a couple days, provided you have the equipment to do so.)

And thus we arrive at the scenario screen! The step counter I provided used additive totals for these, allowing you to play each scenario in whatever order you preferred. The few steps it takes Mog to walk to the representative figure were included as part of that scenario. Whatever order you choose, you’ll have to walk each of these steps either way. I chose Locke’s scenario first, because it begins with the other most tedious segment of the early fewest steps run.

That’s right! You have to take the most direct path through South Figaro, and to do that, you have to go right through this HeavyArmor here. At a low level. And even if you had done experience loops on Lete River, that still wouldn’t have boosted Locke at this point. There’s just no getting around this one.
This would probably be impossible without the game’s desperation attack mechanic. These high-damage hits occur only on a 1/8 chance when your character is on low HP, so your objective is to get hit enough times to reach low HP state without getting killed. Simple experimentation using save states shows that, even when you fail to get the desperation attack, doing things like shuffling your items around changes your damage output. Thus, I spent over an hour shuffling items around in different ways, hoping to land on the correct RNG for a desperation attack, but with no success.
Silly me! I had forgotten the other requirement: A character will never do a desperation attack within the first 25 seconds of a battle! So not only do you have to survive at low HP, but you have to extend that survival past the 26 second mark, before you can even talk about shuffling items and hitting that 1/8 chance. However, after having caught that mistake, I didn’t have too much trouble from there on, and was finally able to resume playing the game again.

The South Figaro basement area has yet another spot for you to get pinned, between those two desks. It was at this point, discovering my only available weapon was a Dirk, that I realized I probably should’ve unequipped Edgar’s weapon, but obviously I wasn’t going to go back for that. Thankfully, Runic does work with a simple Dirk. Having recalled how to manipulate desperation attacks, I went for one again versus TunnelArmr, with the 26-second barrier being much less of an issue thanks to Runic.

Off to Sabin’s scenario! Be careful with your steps here, since it may be quicker to hit required progression points than you may think. Other than that, when you go to assist Cyan, make sure to speak to him from his side, as approaching him from the front will knock you away, adding more steps.

I somehow took an extra step heading into the Phantom Forest? 2276 instead of the expected 2275. I did this multiple times in the stream. I’m not even sure how one could take a single extra step when walking from a single point to another single point, since it seems any deviation would add an even number of steps. At any rate, after getting myself back on optimal step count, I got caught in a bad spot again, just next to that signpost. Make sure to go above and around that.

In a full game fewest steps challenge, you only get to visit a shop twice, and both of those times are in Sabin’s scenario. The first is on the Phantom Train, when you pass by one of the merchant ghosts inside the train cars. Make sure to stock up now! Also, don’t forget to use the exterior ladders to skip the later train car interiors altogether.

The other shop opportunity is in Mobliz, when you have to buy Dried Meat for Gau. (If there was a way to acquire Dried Meat early, you could break the fewest steps challenge open, but I’m not aware of any way to do that.) Also remember to steer clear of that running guy. He will not get out of the way for you, and if you encounter him at the wrong spot, he will force you to reset to preserve your fewest steps routine. (There’s a similar slower fella in Narshe just after the Kefka fight, but that’s beyond the bounds of this challenge.)

I finally managed to avoid one of those reset spots, next to that bridge in the Veldt Cave. In my practice run before posting the bounty, I lucked out and got the Rage for Templar on the way to this cave, but no such luck in my official run. It’s okay, Brawler Rage works just fine. Remember to turn left both times in the Serpent Trench to avoid having to walk through caves.

Terra’s scenario is mostly uneventful, except for this security area. It doesn’t matter which way you walk around that first obstacle, but either way, you’ll have to tag the yellow light multiple times. Failure to do so successfully is a reset. (Or a load state.)

At last, the big showdown! As I noted in my Twitter thread, you get the option to form three parties, only one of which you’ll be using. However, in the menu, they appear 1-2-3, whereas their actual placement ends up being 2-1-3. You want to play as the leftmost party, which is the middle spot on the menu. Feel free to take a moment switching parties to get all your best equipment (since you couldn’t do that before the battle without taking extra steps), then march your way down and kick Kefka’s butt.

And there you have it! A minimum 3,255 steps. My final in-game time was a bit over three hours, but I’m sure it can be done much faster.
Okay, those challenges were fun, so I’ve set up four new ones to carry us through the summer.
NEW BOUNTY CHALLENGES

Recently, through a wacky series of events, I found myself playing no-jump Donkey Kong, wanting to register a score of exactly 100 points by way of a single jump on Kong’s foot on the rivet board. (Yes, I know you can jump in a way that doesn’t score points, but I embraced the extra challenge.)
However, it turns out, beating the first board without jumping is hard! I’ve linked a video of my better inps above, concluding with my eventual successful run. For this challenge, you don’t have to limit your points or burn the clock at the end like I did. But you do have to pass the first board, as you don’t earn points without jumping until you do. Score as many points as you can without use of the jump button. How high can your landlocked Mario go?
https://www.twingalaxies.com/bounty/donkey-kong-highest-score-without-using-the-jump-button-ppmdc/

I’m inclined to stick to challenges on games I’m familiar with, which tend to be much older games. But as far as games released this century go, Minecraft is one I’ve sunk many hours into. I decided to base this challenge around an idea that interested me: Warping yourself arbitrarily far away, then voyaging back to your start location. This turns the game on its ear, as you’re not aimlessly exploring, nor are you searching for a specific item or portal, nor do you have a home base to return to. You have a predetermined destination, and anything you may want to have, you have to pack it with you as you go.

I chose 10000 x 10000 as a reasonably long distance that’s still within the reach of a single 2-3 hour stream. (Although you will get bonus points for completing distances longer than that!) You must select random seed as part of your recording, and when creating your world, you must enable cheats in order to enter the following teleport command:
/tp @s 10000 70 10000
Unfortunately, there seems to be no way to simply drop you on top of whatever land awaits, so I chose 70 as my Y coordinate (elevation). On one test run, I emerged a short distance above ground, and took some light damage after a brief fall. On my other test run, I emerged inside a mountain, and had to quickly dig a hole around me before I suffocated. (There is supposedly a “checkForBlocks” qualifier that will tell you if the space you intend to teleport to is occupied, but I was unable to find examples of people using it.) Honestly, the Y coordinate is up to you, but the X and Z must both be minimum 10000.

While Minecraft tends to spawn you in the general vicinity of 0/0, your goal is to return to exactly 0/0. For this challenge, you may set up a landmark at 0/0 before teleporting out (as I did with that crafting table there), but unlike my test shots, for the actual run, you should teleport with an empty inventory. (Yes, that means teleporting inside a mountain with no tools may require either a reset, or a quick teleport higher up or further out.) The challenge should be played on survival, on “Easy” difficulty minimum – though as always, if you want to play harder difficulty, please do. Everything from world creation to reaching and standing on 0/0 should be recorded as one continuous play. (Okay, pauses are allowed.) The F3 stats screen is your friend, especially when you have to be sure you’re going home in the correct direction. Oh, and while boats and such vehicles are allowed, obviously death warps and trips into the Nether or the Ender Dragon realm are prohibited, as is any other blatant chicanery I didn’t think of.
https://www.twingalaxies.com/bounty/minecraft-return-home-from-a-1000010000-teleport-ppmdc/

Just like how someone has beaten Ocarina of Time damageless, someone has also beaten Super Metroid damageless! Right off the bat, your opening battle with Ridley is exceptionally difficult to pass without taking a hit, so we’re just going to set that battle aside. Take all the damage you want against Ridley, that’s fine. The goal of this challenge is to get as far as you can on Planet Zebes without taking damage.

Similar to the Zelda challenge above, progress here will be measured by number of missile packs (including super missile packs) you collect. You’ll find very quickly that it’s easy to acquire two missile packs before encountering the Chozo statue guarding the bombs. With some practice, you should be able to vanquish it without taking damage. I would suggest keeping one missile for its final form, as that form moves much more chaotically.

All valid runs have to beat that Chozo statue minimum. From there, there are many more missile packs available… at least until you get to that big plant thing leading up to the super missiles. Major glitches will be allowed in this challenge, but as with the Zelda one, you cannot simply glitch your inventory full of missiles. (Honestly, I don’t even know if that’s a thing on Super Metroid, but if it exists, it is disallowed here.) You can glitch your way through the game, but for purposes of tracking progress, missile packs must be manually acquired in their traditional locations.

And we’ll end with a fun one, for all of you old school RPG fanatics like me. Play Dragon Quest 3 (a.k.a. Dragon Warrior 3) and get to Romaly without using the fight command! Major glitches are allowed, so if you can break the game to do this, go for it, but otherwise, you’ll probably be using a lot of magic. I’d recommend a party of Hero-Priest-Wizard-Wizard, but hey, that’s up to you. If you can venture farther, maybe even beat Kandar and his goons using only your sorcerous spellslinging, you’ll get bonus points from me, but reaching Romaly is the minimum for submission. Oh, and ANY version of Dragon Quest 3 is allowed, from the NES and Super Famicom (raw or translated), through Game Boy Color, all the way up to the mobile and Switch versions. Go to town! (Har har.)
As before, swag strats are encouraged and will be noted in the eventual write-up. Everyone who submits a valid run on any of these challenges, either through TG or directly to me (as conforming to site rules) will get the opportunity to voice their thoughts here on the site, regarding this challenge or any other appropriate gaming topic. Results will be posted in September.
And hey, if you’re interested in bounty challenges, you don’t have to limit yourself to ours! There’s a challenge for getting half a million points on three NES black box games (Kung Fu, Duck Hunt, and Super Mario Bros.) There’s a $250 Amazon Gift Card for whoever can do the longest Crazy Jump in Crazy Taxi. And TG user Redelf is offering $500 to anyone who can beat his score on Robotron. And a bunch of other “Just for fun” challenges like the ones this site offers. Check them out as well.
Happy gaming!
Man I’m disappointed that I missed that first round. I hope the OoT no damage run makes a comeback in the future. If I had seen it I would have definitely submitted! I’ve done it once before, and with a little practice I could probably do it again.
I probably won’t repeat any old challenges as official bounties, but if you do happen to put in a solid run toward any previous challenge, please do send a link my way! I’d love to write about it as part of the next bounty update.